
Homemade Flours: A Rewarding DIY Adventure
These days, people are more into homemade and artisanal food, and flour is no different. Making flour at home might seem tough, but it’s actually easy and satisfying. With a few simple tools and ingredients, you can make various flours to fit your diet and cooking tastes. This article shows you six types of flour you can easily make at home, saving you trips to the store and giving you fresh, top – quality flour.
Why Make Your Own Flours
There are lots of good reasons to make your own flour. First, you can control the quality and source of the ingredients, so there are no additives or preservatives. Second, you can make flour to fit your diet, like gluten – free or whole – grain. Also, it can save you money in the long run, especially if you buy grains in bulk. Finally, making flour can be a fun and educational experience, making you appreciate the ingredients you use in cooking and baking more.
Tools and Ingredients for Homemade Flours
To make flour at home, you need some basic tools and ingredients. A good grain mill or a powerful blender is important for grinding grains into flour. Depending on the flour you want, you’ll need different grains or seeds, like wheat berries, rice, or almonds. A fine – mesh sieve or sifter helps get the right texture. And airtight containers for storing the flour keep it fresh.
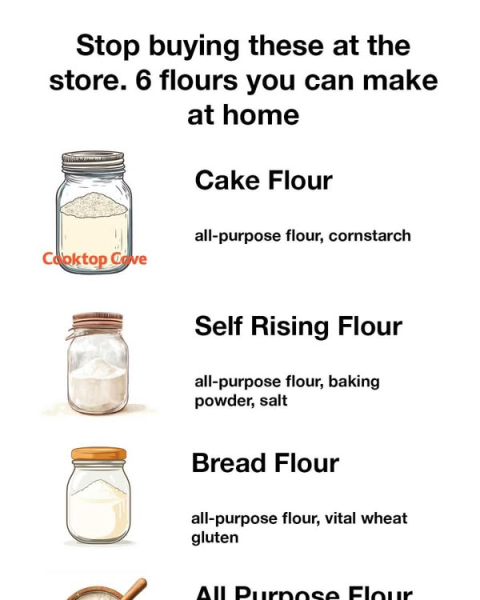
- How to Make Cake Flour at Home
Cake flour has a fine texture and low protein, perfect for soft, fluffy cakes.
Ingredients:
1 cup all – purpose flour
2 tablespoons cornstarch
Instructions:
Measure 1 cup of all – purpose flour into a bowl. Take out 2 tablespoons of flour and put it back. Replace the removed flour with 2 tablespoons of cornstarch. Sift the mixture 2 – 3 times. This mixes the cornstarch well and makes the flour lighter. Use it right away in cake – flour recipes or store it in an airtight container.
Tip: This homemade version is like store – bought cake flour and makes tender, soft cakes. - Making Self – Rising Flour at Home
Self – rising flour is handy for quick breads and biscuits as it has leavening agents.
Ingredients:
1 cup all – purpose flour
1 1/2 teaspoons baking powder
1/4 teaspoon salt
Instructions:
Put 1 cup of all – purpose flour, 1 1/2 teaspoons of baking powder, and 1/4 teaspoon of salt in a medium bowl. Stir or whisk well until everything is mixed evenly. Use it right away in recipes for biscuits, pancakes, or quick breads.
Storage: Store extra in an airtight container and label it so you don’t mix it up with regular flour. - Creating Bread Flour Yourself
Bread flour has more protein than all – purpose flour, giving bread a chewy texture.
Ingredients:
1 cup all – purpose flour
1 tablespoon vital wheat gluten
Instructions:
Put 1 cup of all – purpose flour in a bowl. Add 1 tablespoon of vital wheat gluten (a protein powder that makes dough more elastic). Whisk or sift the mixture to blend the gluten well. Use it in bread – flour recipes like sandwich loaves, pizza dough, or artisan bread.
Note: You can find vital wheat gluten in the baking or health food section of most grocery stores. - Homemade Gluten – Free Flour Blend
For people with gluten problems, a gluten – free flour blend is a must.
Ingredients:
2 cups rice flour (white or brown)
2/3 cup potato starch
1/3 cup tapioca flour (also called tapioca starch)
Instructions:
Put 2 cups of rice flour, 2/3 cup of potato starch, and 1/3 cup of tapioca flour in a large bowl. Mix well. Store it in an airtight container in a cool, dry place.
Usage: Use this blend 1:1 instead of all – purpose flour in most recipes. For baked goods, add a binder like xanthan gum or guar gum (about 1/2 teaspoon per cup of flour). - Making All – Purpose Flour at Home
Even though all – purpose flour is easy to buy, making it at home ensures freshness.
Ingredients:
Whole wheat berries
Equipment:
Grain mill or high – powered blender
Fine mesh sieve or flour sifter
Instructions:
Put whole wheat berries in a grain mill or high – speed blender. Grind until you get fine flour. To make it more like store – bought all – purpose flour, sift the flour to remove the bran and germ. This makes the flour lighter. Sift again if needed. Store it in an airtight container, away from heat and light.
Tip: Homemade all – purpose flour is less refined but still good for baking, cooking, and thickening. - DIY Whole Wheat Flour
Whole wheat flour is healthier as it has the whole grain, including the bran and germ.
Ingredients:
Whole wheat berries
Equipment:
Grain mill or high – speed blender
Instructions:
Pour whole wheat berries into your grain mill or blender. Grind on high until you get a slightly coarse flour. Don’t sift it—you want to keep the bran and germ for nutrition. Store the flour in an airtight container, preferably in the fridge or freezer to keep it fresh longer (the germ’s oils can go bad).
Storing Homemade Flours
Storing your homemade flours right is important. Use airtight containers to keep out moisture and pests. Keep them in a cool, dark place like a pantry. For long – term storage, refrigerate or freeze, especially whole – grain flours (because of their high oil content). Label the containers with the flour type and the date you made it.
Conclusion: Love the Art of Homemade Flours
Making your own flour at home is great. It gives you better quality, freshness, saves money, and lets you customize. Try different grains and blends to make flour that fits your diet and cooking. Enjoy making this important kitchen ingredient from scratch. It will not only improve your cooking and baking but also make you appreciate flour more.